This is something that has been on my list for quite some time now and when I realised I needed some S3 storage for a backup solution, I thought I’d start with AWS Free Tier to see what else it brings. As you may know AWS is one of the largest cloud providers in the world. They offer a large number of cloud services like: virtual servers, cloud storage, databases, IoT, out-of-the-box machine learning models and many more. AWS has over 140 different services and the most popular ones are available (within limits) in the so called Free Tier. I am mainly interested in S3 storage because I have a need to store some backup files there. The other service I will be looking at (in another blog post) is the use of EC2 compute in combination with VMware Cloud Automation Services.
Signing up
To sign up go to the following website: https://aws.amazon.com/free/ and click on Create a Free Account.

From here just fill in all the fields that follow. You will need all your personal details as well as your credit card information (in case you go over the free tier limit). Don’t worry too much about going over the limit as there are ways that will help you control this, I will cover this later.
First things to do
If everything went according to plan you should now be signed in to the management console with the so called root account. The root account is the master account that can control everything. Because of this, there are some security best practices you should take into account. These are:
- Delete root access keys
- Set up multi-factor authentication on your root account
- Create individual IAM account
- Use groups to assign permissions
- Create IAM password policy
To set up these security best practices go to the IAM service.

When you first start the IAM service you will notice a to-do list which includes the above items. I suggest you go through all of these and make sure your account is secure.
The easiest way is to click on the item and button that follows. This will take you to the relevant portion of the console. For instance clicking activate and then manage MFA will take you to the page to set up MFA.

After you have gone through all the items your list should look like this.

Oh wait, there is more
One other thing you should change is the IAM users sign-in link. By default this link, which is on the top of the screen in the IAM service, holds your AWS account number. You can use the customize option to change that to anything you want as long it is globally unique. This way you do not have to expose your account number.

What about costs
One thing I was afraid of when activating my account was that I would accidentally end up with a massive bill. After using my AWS free tier for a while I can report this did not happen. To be sure this won’t happen in the future there are some safeguards you can set up. One of these is the use of budgets and alerting. To set up a budget go the the billing dashboard. From here click ‘create budget’ and fill out the form.

The next step is to set an alert at a specific threshold.

Now, if for some reason you start incurring costs you will get a notification before the bill gets out of control.
To get an overview of your usage within the AWS free tier services you can check out the ‘Top AWS Free Tier services by usage’.
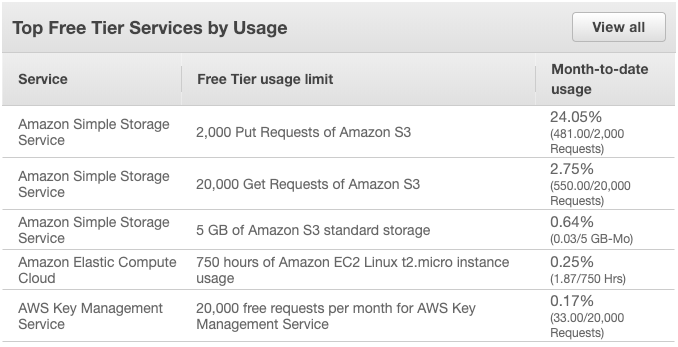
You can even get a monthly forecast when you click on the ‘View All’ button.

Conclusion
Getting started with AWS free tier and start using AWS services was actually pretty simple. If you keep these steps in mind you will make sure to have a secure start. For me, the next step is experimenting with the different services and see how I can integrate with VMware Cloud Automation Services. I have also set up an S3 bucket and a user with an API key to backup my home automation system.
Thank you